Page 1 of 1
AMA struts for Telstar 26 Mk 2
Posted: Mon Oct 14, 2013 3:24 pm
by Michael McDonald
We are currently restoring a Telstar Mk2 which has highly corroded mild steel struts
There are three piece construction with main hull and AMA plates and intermediate struts which are slightly longer forward
The struts appear to have originally been 6mm MS plate folded after drilling and the plates on the port AMA are slightly curved while those on the starboard side are flat.
Does anyone have engineering drawings for these struts which I could send to a fabrication shop
Re: AMA struts for Telstar 26 Mk 2
Posted: Sun Nov 17, 2013 10:02 pm
by sandeb2
mine - 8M #254 are galvanized thick walled 1.5 in square tube stock and weigh about 15-20 # each. they are all straight and same length and go in easy. i can send you pics if you want.
Re: AMA struts for Telstar 26 Mk 2
Posted: Mon Dec 30, 2013 6:54 pm
by satallite
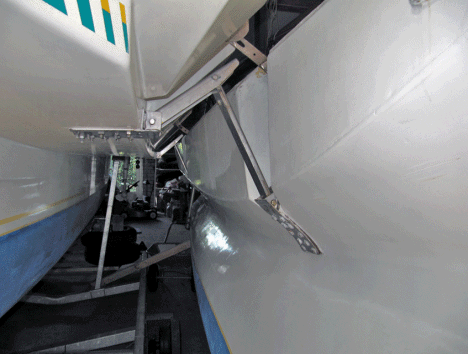
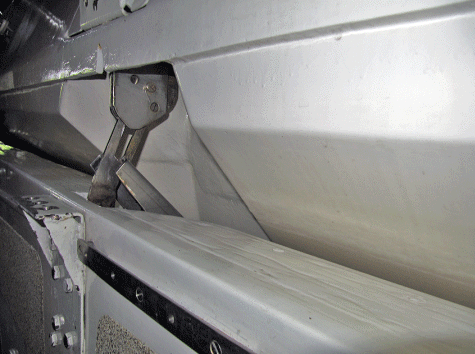
You might be interested to look at these pictures of a modified folding mechanism for a Mk2 Telstar.

- Telstar-port-hinge-frwrd.gif (91.83 KiB) Viewed 2011 times

- Telstar-stb-hinge.gif (108.9 KiB) Viewed 2011 times
It is currently for sale in France at
http://www.multihull.nl/multihulls/used ... .fotos.htm
Re: AMA struts for Telstar 26 Mk 2
Posted: Mon Dec 30, 2013 6:57 pm
by satallite
Re: AMA struts for Telstar 26 Mk 2
Posted: Mon Jan 27, 2014 2:25 am
by Michael McDonald
Many thanks for the information
The folding stainless steel plates look very
Neat
I made up some drawings of the originals and
had replicas made in a local fabrication shop
I am pleased with the result and have moved
On to some glass fibre work
I am now looking to position a box for 1 or 2
batteries. The original battery box appears to
be in the bilge to the port side of the centreboard
Housing and has very small dimensions
I would be concerned that this position would
Get wet or potentially flooded and wondered
If people had a better alternative.
Re: AMA struts for Telstar 26 Mk 2
Posted: Mon Jan 27, 2014 5:36 am
by sandeb2
mine were originally there also but very crowded. i moved them to below the cockpit sole.
Re: AMA struts for Telstar 26 Mk 2
Posted: Mon Jan 27, 2014 9:07 pm
by Michael McDonald

Do you mean the space below
the cockpit floor
I looked at building a platform
In there but my boat has cockpit
drains which drain out below the
waterline on the opposite sides of
the boat and cris cross this space below
I am not entirely sure I like the idea
of two submerged skin fittings just to
drain the cockpit
I have seen some boats with direct
Scuppers from the cockpit.
Perhaps this is a wetter set up in bad conditions.
I had planned to fit new ball valves and retain
the current arrangement but might be able to
Make sufficient space for a battery.
I was also considering using an engine battery
Aft and fitting a household battery opposite the
Cooker at high level to spread the weight
Any opinions on best option welcome
Re: AMA struts for Telstar 26 Mk 2
Posted: Wed Jan 29, 2014 8:36 am
by ar99kid
that is a very interesting mechanism ! and seems to be much more stable during lift/fold operation. i am restoring an mk2 also but unfortunately very slow ... can you send me more pictures and higher resolution on my email
ar99kid@gmail.com ? i have finished mine with some mods for folding under the main hull , but never know in the future...
thanks and post the working on the boat !
Re: AMA struts for Telstar 26 Mk 2
Posted: Tue Apr 01, 2014 3:18 pm
by sandeb2
as to battery placement, sorry for the delay i dont get notifications of reply
my batteries are under cockpit sole for low weight and fairly easy access.
if i had more time i would run batt cables on left side of cabin and put all batteries in the bow for better weight distribution.
my boat #256 has direct Scuppers from the cockpit.
Re: AMA struts for Telstar 26 Mk 2
Posted: Thu Apr 03, 2014 7:45 pm
by Michael McDonald
Thank you for your response
I will take your suggestions on board
as I suspect that the weight should be positioned
near the centre of effort for optimum trim